What happens when any link enters
TASK 5
Q-1 When I enter www.google.com in browser what happens in
background?
The operation of Hypertext Transfer Protocol (HTTP) involves the
communication between a Hypertext Transfer Protocol (HTTP) client
application (Usually web browser) and a Hypertext Transfer Protocol
(HTTP) server servers like IIS).

Hypertext Transfer Protocol (HTTP) uses Transmission Control
Protocol (TCP) as the Transport Layer Protocol at Well Known port
number 80. Once the TCP connection is established, the two steps in
Hypertext Transfer Protocol (HTTP) communication are
1) HTTP Client Request: Hypertext Transfer Protocol (application
(Web HTTP) client sends an Hypertext Transfer Protocol (HTTP)
Request to the Hypertext Transfer Protocol (HTTP) Server according
to the HTTP standard, specifying the information the client like to
retrieve from the Hypertext Transfer Protocol (HTTP) Server.)
HTTP Server Response: Once the Hypertext Transfer Protocol
(HTTP) Request arrived at the Hypertext Transfer Protocol (HTTP)
server, it will process the request and creates an Hypertext Transfer
Protocol (HTTP) Response message.
The Hypertext Transfer Protocol (HTTP) response message may
contain the resource the Hypertext Transfer Protocol (HTTP) Client
requested or information why the Hypertext Transfer Protocol (HTTP)
request failed.
Q-2 Starting from windows 1997 till windows 2010 what are the
technologies introduced?
Windows 98
Released in June 1998, Windows 98 built on Windows 95 and brought with it IE
4, Outlook Express, Windows Address Book, Microsoft Chat and NetShow
Player, which was replaced by Windows Media Player 6.2 in Windows 98 Second
Edition in 1999.
Windows 98 introduced the back and forward navigation buttons and the
address bar in Windows Explorer, among other things. One of the biggest
changes was the introduction of the Windows Driver Model for computer
components and accessories – one driver to support all future versions of
Windows.
USB support was much improved in Windows 98 and led to its widespread
adoption, including USB hubs and USB mice.
Windows ME
Considered a low point in the Windows series by many – at least, until they saw
Windows Vista – Windows Millennium Edition was the last Windows to be
based on MS-DOS, and the last in the Windows 9x line.
Released in September 2000, it was the consumer-aimed operating system
twined with Windows 2000 aimed at the enterprise market. It introduced some
important concepts to consumers, including more automated system recovery
tools.
IE 5.5, Windows Media Player 7 and Windows Movie Maker all made their
appearance for the first time. Auto complete also appeared in Windows
Explorer, but the operating system was notorious for being buggy, failing to
install properly and being generally poor.
Windows XP and server 2003 series
On October 25, 2001, Microsoft released Windows XP (codenamed "Whistler"). The merging of the
Windows NT/2000 and Windows 95/98/Me lines was finally achieved with Windows XP. Windows
XP uses the Windows NT 5.1 kernel, marking the entrance of the Windows NT core to the
consumer market, to replace the aging Windows 9x branch. The initial release was met with
considerable criticism, particularly in the area of security, leading to the release of three
major Service Packs.
Windows vista and server2008
One major difference between Vista and earlier versions of Windows, Windows 95 and later, is that
the original start button was replaced with the Windows icon in a circle (called the Start Orb). Vista
also features new graphics features, the Windows Aero GUI, new applications (such as Windows
Calendar, Windows DVD Maker and some new games including Chess, Mahjong, and Purble
Place), [28] Internet Explorer 7, Windows Media Player 11, and a large number of underlying
architectural changes. Windows Vista has the version number NT 6.0. Since its release, Windows
Vista has had two service packs.
Windows 7
Some features of Windows 7 are faster booting, Device Stage, Windows Power Shell, less obtrusive
User Account Control, multi-touch, and improved window management. [32] Features included with
Windows Vista and not in Windows 7 include the sidebar (although gadgets remain) and several
programs that were removed in favor of downloading their Windows Live counterparts.
Windows 8
One edition, Windows RT, runs on some system-on-a-chip devices with mobile 32-bit ARM
(ARMv7) processors. Windows 8 features a redesigned user interface, designed to make it easier for
touch screen users to use Windows. The interface introduced an updated Start menu known as the
Start screen, and a new full-screen application platform. The desktop interface is also present for
running windowed applications, although Windows RT will not run any desktop applications not
included in the system. On the Building Windows 8 blog, it was announced that a computer running
Windows 8 can boot up much faster than windows7.
Windows 10
Windows 10, codenamed Threshold (Later Redstone), is the current release of the Microsoft
Windows operating system. Unveiled on September 30, 2014, it was released on July 29, 2015. [47] It
was distributed without charge to Windows 7 and 8.1 users for one year after release. A number of
new features like Cortana, the Microsoft Edge web browser, the ability to view Windows Store apps
as a window instead of full screen, virtual desktops, revamped core apps, Continuum, and a unified
Settings app were all features debuted in Windows 10. Microsoft has announced that Windows 10
will be the last major version of its series of operating systems to be released. Instead, Microsoft will
release major updates to the operating system via download or in Windows Update, similar to the
way updates are delivered in macOS. [48]
Q-3 what are the components required assembling a computer
desktop?
Motherboard.
Processor.
Memory (RAM)
Case/chassis.
Power supply.
Floppy drive.
Hard disk.
CD-ROM, CD-RW, or DVD-ROM drive.
Monitor
Mouse
Cooling Fan
RAM
Q-4 Illustrate the steps of assembling process of desktop
computer with diagrams.


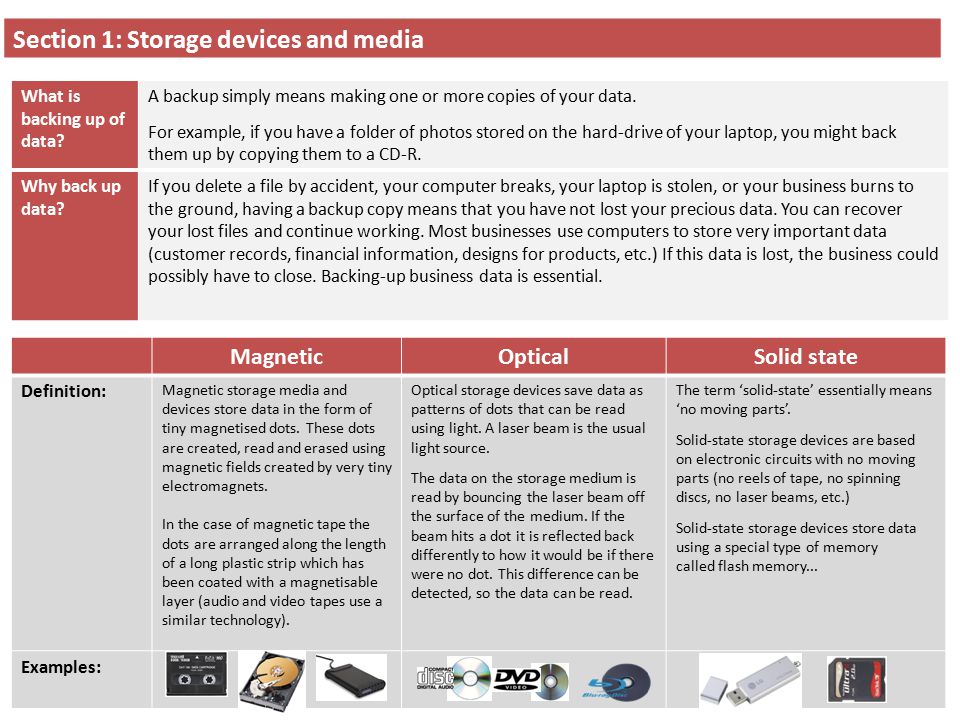
6)Difference between optical storage device and magnetic storage device. How they are different in storage? With examples.

background?
The operation of Hypertext Transfer Protocol (HTTP) involves the
communication between a Hypertext Transfer Protocol (HTTP) client
application (Usually web browser) and a Hypertext Transfer Protocol
(HTTP) server servers like IIS).
Hypertext Transfer Protocol (HTTP) uses Transmission Control
Protocol (TCP) as the Transport Layer Protocol at Well Known port
number 80. Once the TCP connection is established, the two steps in
Hypertext Transfer Protocol (HTTP) communication are
1) HTTP Client Request: Hypertext Transfer Protocol (application
(Web HTTP) client sends an Hypertext Transfer Protocol (HTTP)
Request to the Hypertext Transfer Protocol (HTTP) Server according
to the HTTP standard, specifying the information the client like to
retrieve from the Hypertext Transfer Protocol (HTTP) Server.)
HTTP Server Response: Once the Hypertext Transfer Protocol
(HTTP) Request arrived at the Hypertext Transfer Protocol (HTTP)
server, it will process the request and creates an Hypertext Transfer
Protocol (HTTP) Response message.
The Hypertext Transfer Protocol (HTTP) response message may
contain the resource the Hypertext Transfer Protocol (HTTP) Client
requested or information why the Hypertext Transfer Protocol (HTTP)
request failed.
Q-2 Starting from windows 1997 till windows 2010 what are the
technologies introduced?
Windows 98
Released in June 1998, Windows 98 built on Windows 95 and brought with it IE
4, Outlook Express, Windows Address Book, Microsoft Chat and NetShow
Player, which was replaced by Windows Media Player 6.2 in Windows 98 Second
Edition in 1999.
Windows 98 introduced the back and forward navigation buttons and the
address bar in Windows Explorer, among other things. One of the biggest
changes was the introduction of the Windows Driver Model for computer
components and accessories – one driver to support all future versions of
Windows.
USB support was much improved in Windows 98 and led to its widespread
adoption, including USB hubs and USB mice.
Windows ME
Considered a low point in the Windows series by many – at least, until they saw
Windows Vista – Windows Millennium Edition was the last Windows to be
based on MS-DOS, and the last in the Windows 9x line.
Released in September 2000, it was the consumer-aimed operating system
twined with Windows 2000 aimed at the enterprise market. It introduced some
important concepts to consumers, including more automated system recovery
tools.
IE 5.5, Windows Media Player 7 and Windows Movie Maker all made their
appearance for the first time. Auto complete also appeared in Windows
Explorer, but the operating system was notorious for being buggy, failing to
install properly and being generally poor.
Windows XP and server 2003 series
On October 25, 2001, Microsoft released Windows XP (codenamed "Whistler"). The merging of the
Windows NT/2000 and Windows 95/98/Me lines was finally achieved with Windows XP. Windows
XP uses the Windows NT 5.1 kernel, marking the entrance of the Windows NT core to the
consumer market, to replace the aging Windows 9x branch. The initial release was met with
considerable criticism, particularly in the area of security, leading to the release of three
major Service Packs.
Windows vista and server2008
One major difference between Vista and earlier versions of Windows, Windows 95 and later, is that
the original start button was replaced with the Windows icon in a circle (called the Start Orb). Vista
also features new graphics features, the Windows Aero GUI, new applications (such as Windows
Calendar, Windows DVD Maker and some new games including Chess, Mahjong, and Purble
Place), [28] Internet Explorer 7, Windows Media Player 11, and a large number of underlying
architectural changes. Windows Vista has the version number NT 6.0. Since its release, Windows
Vista has had two service packs.
Windows 7
Some features of Windows 7 are faster booting, Device Stage, Windows Power Shell, less obtrusive
User Account Control, multi-touch, and improved window management. [32] Features included with
Windows Vista and not in Windows 7 include the sidebar (although gadgets remain) and several
programs that were removed in favor of downloading their Windows Live counterparts.
Windows 8
One edition, Windows RT, runs on some system-on-a-chip devices with mobile 32-bit ARM
(ARMv7) processors. Windows 8 features a redesigned user interface, designed to make it easier for
touch screen users to use Windows. The interface introduced an updated Start menu known as the
Start screen, and a new full-screen application platform. The desktop interface is also present for
running windowed applications, although Windows RT will not run any desktop applications not
included in the system. On the Building Windows 8 blog, it was announced that a computer running
Windows 8 can boot up much faster than windows7.
Windows 10
Windows 10, codenamed Threshold (Later Redstone), is the current release of the Microsoft
Windows operating system. Unveiled on September 30, 2014, it was released on July 29, 2015. [47] It
was distributed without charge to Windows 7 and 8.1 users for one year after release. A number of
new features like Cortana, the Microsoft Edge web browser, the ability to view Windows Store apps
as a window instead of full screen, virtual desktops, revamped core apps, Continuum, and a unified
Settings app were all features debuted in Windows 10. Microsoft has announced that Windows 10
will be the last major version of its series of operating systems to be released. Instead, Microsoft will
release major updates to the operating system via download or in Windows Update, similar to the
way updates are delivered in macOS. [48]
Q-3 what are the components required assembling a computer
desktop?
Motherboard.
Processor.
Memory (RAM)
Case/chassis.
Power supply.
Floppy drive.
Hard disk.
CD-ROM, CD-RW, or DVD-ROM drive.
Monitor
Mouse
Cooling Fan
RAM
Q-4 Illustrate the steps of assembling process of desktop
computer with diagrams.
Step 1: Compatibility Check All of Your Components
This was already mentioned but it is very important. If you do not make sure all of your components work together correctly you will not have a working computer before you even start this project.
Step 2: Take Out Screws and Cover Off the Case
Step 3: Lay the Case on Its Side
Laying the case on its side on a clean, solid surface is best.
Step 4: Install the Stand Up Screws
Sometimes there are labels on the case of what screw holes to use, if not, you need to look at your motherboard and the case to figure out which ones you need to use. You can put them in with only your hands, however you should make sure they are in securly with a small wrench.
Step 5: Install the I/o Plate From Inside the Case
This plate should come with your motherboard and will fit into the hole on the back of your computer from the inside of the case.
Step 6: Insert Mobo and Screw Down
Note: make sure to keep wires from the case out of the way.
With the i/o plate in, it may seem a little difficult to get the motherboard to sit properly.You may have to use a little more force than you think is necessary but still be wary,if you do not have the i/o plate in correctly or do not line up the ports on the motherboard, components can be damaged.
With the i/o plate in, it may seem a little difficult to get the motherboard to sit properly.You may have to use a little more force than you think is necessary but still be wary,if you do not have the i/o plate in correctly or do not line up the ports on the motherboard, components can be damaged.
Step 7: Insert PSU and Screw Down
The power supply can normally be put at the top or bottom of the computer.
At the bottom, four screws on the back,as seen in the first image, will hold it in place and at the top, four screw on top will hold it in place. the second image shows three of the four holes you would use to install the psu into the top of the case.
Note: It is more common to see the PSU at the bottom which is set up already to be used so if you choose to put it at the top you may have to follow instructions that came with your case to do so properly.
Step 8: Open CPU Slot, Remove Cover, Insert CPU, and Close
Danger: If the CPU is NOT lined up correctly it can damage the component beyond repair
Please use the image here to do this step properly, it is the instructions given with an intel motherboard and I believe it shows how to do this step better than I could explain.
Note: You may seem to need more force than you think is necessary to close the CPU, if you have it lined up properly there should be no problems.
Step 9: Install CPU Fan
Some fans are screwed on and others have pushpins. All you have to do is line up the holes and makes sure it sits correctly unmoving when you are finished.
Some fans are screwed on and others have pushpins. All you have to do is line up the holes and makes sure it sits correctly unmoving when you are finished.
Step 10: Insert RAM Into RAM Slot
This video shows installing RAM, a GPU, and a wireless card. Along with hooking up the power cords, front panel cords, and fan connectors.Step
11: Insert Extra Cards Like Video, Sound, or Wireless Cards One is left open because the way the GPU is designed it is unable to hook properly so I used a screw to correctly hold the GPU in place. For other cases it is likely you will need to use screws to hold down your extra cards.
Step 12: Install Hard Drive
For the case I am using there are easy to use bays you slide your hard drives into, as seen in the image. If you are using multiple hard drives I suggest spacing them apart for maximum airflow.
Step 13: Install DvD Drive
for the case in the image, to install disc drives all you have to do is insert it from the front and push the correct button which inserts the "screws" that would normally hold it in place.
Step 14: Connect Motherboard Power Connectors
The motherboard always has a main large 24 pin connector, seen in the first image, and sometimes has other smaller power connector like the one in the second image.
Step 15: Peripheral Power Connectors
The hard drive and disc drives both have their own power inputs. find the correct connectors for them on the psu and plug them in.
Sometimes the extra cards you have installed require extra power. This graphics card for example requires two extra power connectors.
Sometimes the extra cards you have installed require extra power. This graphics card for example requires two extra power connectors.
Step 16: Plug in Fan Cords
Your CPU fan should have a specific fan plug in spot near it.
Now you should find all the fan plug ins on your motherboard and decide how to attach the fans on your case. The first image is what a fan connector looks like and the second is what they connect too.
Now you should find all the fan plug ins on your motherboard and decide how to attach the fans on your case. The first image is what a fan connector looks like and the second is what they connect too.
Step 17: Plug in Front Panel Cords
For this step, you will have to reference your motherboards manual as the location each wire for your case needs to be plugged into can be different for each motherboard
For USB cords you may need to refer to a map of your motherboard to find the proper place to plug these into.
If you have eSATA it simply plugs into a SATA slot on the motherboard
HD audio will also have to be located on your motherboard as its location cande different for each motherboard.
For USB cords you may need to refer to a map of your motherboard to find the proper place to plug these into.
If you have eSATA it simply plugs into a SATA slot on the motherboard
HD audio will also have to be located on your motherboard as its location cande different for each motherboard.
Step 18: Plug in Peripheral Cords
For your disc drives and hard drives you should need SATA cords which simply plug into the SATA ports on the motherboard.
An image is given as an example of a SATA cord.
Step 19: Plug in Wall Cord and Turn On
If your computer turns on and stays on, all your fans turn on, and all lights turn on correctly, congratulations! You have just put together a working computer. You can now connect peripherals like a mouse, keyboard and monitor and start installing your new OS system if you did not get a hard drive with one.
Otherwise, if you are having problems please continue onto the next step for trouble shooting.
Otherwise, if you are having problems please continue onto the next step for trouble shooting.
Step 20: Trouble Shooting
I will not be taking into account problems with compatibility and will only look into problems that may have occurred while going through these instructions.
Computer wont turn on:
Make sure on the back of your computer the I/0 switch on the power supply is switched to the I. As seen in the first image.
If this does not work, look at your front panel wires. Make sure they are connected to the correct pins and in the correct orientation.
You will have to refer to your motherboards manual for the proper connections.
Fans wont work:
Sometimes there is an un-used pin for case fans. Make sure your connectors are connected to the correct pins and are in the correct orientation. The second image is an example of what one of these fan connections look like.
Lights wont work:
Look at where all the small wires for your front panel connect, make sure they are on the right pins and in the correct orientation. You will have to refer to your motherboards manual for the proper connections.
5) What is difference between assembling process of desktop and laptop?
The Main Difference Between Desktop and Laptop assembling.
A laptop is an all-in-one machine, with the screen, keyboard and mouse built into the device. Comparatively, desktops typically have a separate keyboard and mouse, and the central processing unit can be separate from the computer monitor.
Magnetic storage uses disks coated with a magnetic material. Each tiny bit of the disk carries a magnetic charge; the direction of that charge determines whether it represents a 1 or a 0. Optical storage, meanwhile, uses disks made of reflective material; how each bit reflects light–or doesn't reflect it–determines whether it's a 1 or a 0.

Comments
Post a Comment